Simple Roast Chicken: from brining to broth, worth it every time
- Jan 24, 2019
- 5 min read

Whole chickens are often overlooked for their convenient pre-packaged counterparts. However, when treated with a bit of prep (10 min max), and some planning (just one day ahead), whole roast chickens offer so much and are certainly worthy of becoming a menu planning staple.
Below we go through a simple two ingredient brine for your a chicken, which delivers tissue paper thin crispy skin and moist flavorful meat, what to do with the inside package of organs you find inside (yes, you want keep those; that little package is gold), and broth basics delicious enough to sip on its own, yet practical for everything from soups to cooking grains, dried beans, or braising vegetables with.
The Brine and Roasting
Ingredients:
Buttermilk (2-3 cups) * see step 5
Salt
Steps:
Remove the package inside the bird containing the organs and set aside in a sealed container in the fridge for the broth.
Place the chicken in a large zip lock bag or in a large bowl, either way, big enough to submerge the chicken in the buttermilk.
Sprinkle heavily, all over, with salt, about 1/4 cup in total. When you see the picture below, you may gasp at the quantity, trust me, or rather, trust Samin here.
Then cover with buttermilk.
I have a confession, I don't buy buttermilk for this. Buttermilk is more expensive than regular milk and incredibly easy to make on your own. I used 50% whole milk and 50% water, you've just made 2% milk. I'd not drink it straight up this way, yet for cooking purposes it is the exact same thing (drinking too, just a mindset). Then add some acid, about 2-3 tablespoons. You can use lemon juice, or light vinegar (such as apple cider) - all into the bag or bowl, and you have made buttermilk.
Cover your bowl, or if you are using a bag, seal it, and place in a container for safe keeping in your fridge over night.
Remove from the fridge about 1-2 hrs before cooking so it can come to room temperature.
Preheat your oven to 450 degrees.
Rub a little oil on the bottom of your pan, I use a large cast iron skillet. Take the chicken from the brine and just drain the brine off from the inside, and place into the pan. The skin will be wet with a bit of buttermilk here and there, just leave it as is. No need to salt or anything.
Roast at 450 for about 1-11/2 hours size depending. I usually leave a 3 1/2 pound bird in there for a good 45min at 450, then turn it down to 400 for another 30-45 min, or until the juices by the thigh run clear.
*If you are defrosting your chicken you'll want to defrost it fully (for about 36-48 hrs in the fridge) prior to brining it, to allow the brine to do it's magic, and to ensure the bird cooks evenly.


This brine is directly from Samin Nosrat's Netflix mini series Salt, Fat, Acid, Heat, inspired by her namesake cookbook Salt, Fat, Acid, Heat: Mastering the Elements of Good Cooking. I love her hands on practical yet classic approach to creating delicious food and highly recommend both her book and the mini series.
At first I was a bit skeptical. Most recipes that do brine do so with the focus on the inside meat becoming juicy and flavorful. And then after that, patting down the wet chicken to be dry, and rubbing it down Julia Child style with butter or oil or a dry rub, and even basting it during cooking, all to ensure a crispy exterior worthy of all that interior fuss. This recipe is just buttermilk and salt, no patting down dry, or adding extra seasoning. You literally take it from the buttermilk into a pan, into the oven, and then onto your plate without basting or adding any salt or fat or anything. And .... this technique blew me away. This produces hands down the most incredible roast chicken. I'm more of a veggie person at heart, yet this bird, I'd gobble up the whole thing, and certainly have to remember to share when it comes to the skin. It's off the hook incredible.
For our family of two adults and one toddler a roast chicken yields at least two full meals, a lunch, and about a gallon and a half of scrumptious stock. We usually make one once a week or so for the week's menu options.


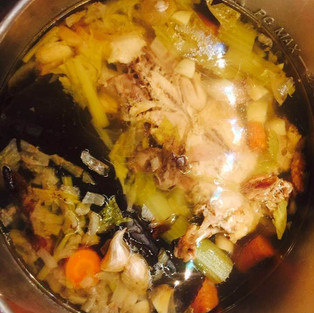


The Bone Broth
Ingredients:
The chicken bones saved from carving and the inner organs saved from brining
garlic
onion
carrot
celery
1-2 tablespoons apple cider vinegar
* optional add ins: a sheet of dried kelp or kombu
Steps:
Roughly cut up the veggies and garlic, add to either a slow cooker, large soup pot, or instapot.
Add in the chicken bones and insides, vinegar, and kombu.
Cover with water.
If you are using an instapot I usually set it for 40 min on high pressure and then let it sit and cool down for about 30min-1hr. If you are using a slow cooker, I'd say 6-8 hrs on low. If you are using the stovetop, bring to a bowl, then turn down low and cover to simmer for 3-4 hrs checking on it occasionally.
The seaweed (kelp or kombu) won't make it taste fishy, it simply adds a depth of flavor, some natural salt, and a boatload of nutrients. Sea vegetables are some of the most nutrient dense foods we can eat, yet most of us, myself included, maybe eat seaweed in miso soup, or sushi, once or twice a month if that. Including it in broths and soups is just a great way to sneak it in knowing you are adding some real flavor as well as health benefits.
The vinegar helps to pull the nutrients from the bone and chicken organs into the broth.
As for that package of gold ... the organs, it contains intense flavor, and that liver, it is full of vitamins. We tend to disregard organ meat in this country, even though it is often the most beneficial part to eat. Admittedly, I'm not a fan of liver, despite knowing it's purpose. That being said, tossing it in your broth is an easy way for even the pickiest eater to have some, and the package usually contains the heart and neck as well, all parts consumed the world over. One day maybe I'll gather the gumption to eat them as is, for now, to my soups and sauces they go.
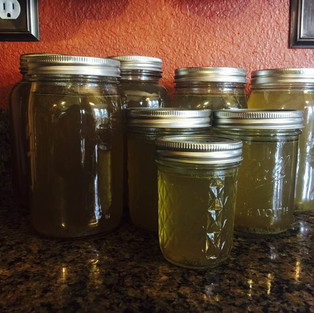
After you can funnel into mason jars using a fine mesh sieve or cheese cloth (see above photos) and either can or store in the fridge and use anytime you are cooking up dried beans or making rice, braising greens, or of course making soup.
As it happens, we usually have enough to fill 3 large mason jars and then a mug sized amount left over. I add a little salt and pepper and savor a cuppa fresh hot broth. Sometimes I laugh at who I've become, sipping broth feels and tastes so gosh darn nourishing, almost unapologetically good for you, in body, mind and soul. And yet, a weekly tradition of sweet good nourishment may be exactly what this world needs today, I certainly do at least.


Comments